Previous blog as follows:
http://theblasfrompas.blogspot.com.au/2018/04/install-pivotal-container-service-pks.html
1. First we will want an external Load Balancer for our K8's clusters which will need to exist and it would be a TCP Load balancer using Port 8443 which is the port the master node would run on. The external IP address is what you will need to use in the next step
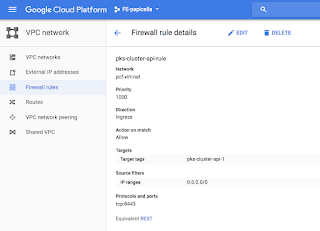
2. Create a Firewall Rule for the LB with details as follows.
Note: the LB name is "pks-cluster-api-1". Make sure to include the network tag and select the network you installed PKS on.
- Network: Make sure to select the right network. Choose the value that matches with the VPC Network name you installed PKS on
- Ingress - Allow
- Target: pks-cluster-api-1
- Source: 0.0.0.0/0
- Ports: tcp:8443
3. Now you could easily just create a cluster using the external IP address from above or use a DNS entry which is mapped to the external IP address which is what I have done so I have use a FQDN instead
pasapicella@pas-macbook:~$ pks create-cluster my-cluster --external-hostname cluster1.pks.pas-apples.online --plan small
Name: my-cluster
Plan Name: small
UUID: 64a086ce-c94f-4c51-95f8-5a5edb3d1476
Last Action: CREATE
Last Action State: in progress
Last Action Description: Creating cluster
Kubernetes Master Host: cluster1.pks.pas-apples.online
Kubernetes Master Port: 8443
Worker Instances: 3
Kubernetes Master IP(s): In Progress
4. Now just wait a while while it creates a VM's and runs some tests , it's roughly around 10 minutes. Once done you will see the cluster as created as follows
pasapicella@pas-macbook:~/pivotal/GCP/install/21/PKS$ pks list-clusters
Name Plan Name UUID Status Action
my-cluster small 64a086ce-c94f-4c51-95f8-5a5edb3d1476 succeeded CREATE
5. Now one of the VM's created would be the master Vm for the cluster , their a few ways to determine the master VM as shown below.
5.1. Use GCP Console VM instances page and filter by "master"
5.2. Run a bosh command to view the VM's of your deployments. We are interested in the VM's for our cluster service. The master instance is named as "master/ID" as shown below.
$ bosh -e gcp vms --column=Instance --column "Process State" --column "VM CID"
Task 187. Done
Deployment 'service-instance_64a086ce-c94f-4c51-95f8-5a5edb3d1476'
Instance Process State VM CID
master/13b42afb-bd7c-4141-95e4-68e8579b015e running vm-4cfe9d2e-b26c-495c-4a62-77753ce792ca
worker/490a184e-575b-43ab-b8d0-169de6d708ad running vm-70cd3928-317c-400f-45ab-caf6fa8bd3a4
worker/79a51a29-2cef-47f1-a6e1-25580fcc58e5 running vm-e3aa47d8-bb64-4feb-4823-067d7a4d4f2c
worker/f1f093e2-88bd-48ae-8ffe-b06944ea0a9b running vm-e14dde3f-b6fa-4dca-7f82-561da9c03d33
4 vms
6. Attach the VM to the load balancer backend configuration as shown below.
7. Now we can get the credentials from PKS CLI and pass them to kubectl as shown below
pasapicella@pas-macbook:~/pivotal/GCP/install/21/PKS$ pks get-credentials my-cluster
Fetching credentials for cluster my-cluster.
Context set for cluster my-cluster.
You can now switch between clusters by using:
$kubectl config use-context
pasapicella@pas-macbook:~/pivotal/GCP/install/21/PKS$ kubectl cluster-info
Kubernetes master is running at https://cluster1.pks.domain-name:8443
Heapster is running at https://cluster1.pks.domain-name:8443/api/v1/namespaces/kube-system/services/heapster/proxy
KubeDNS is running at https://cluster1.pks.domain-name:8443/api/v1/namespaces/kube-system/services/kube-dns/proxy
monitoring-influxdb is running at https://cluster1.pks.domain-name:8443/api/v1/namespaces/kube-system/services/monitoring-influxdb/proxy
pasapicella@pas-macbook:~/pivotal/GCP/install/21/PKS$ kubectl get componentstatus
NAME STATUS MESSAGE ERROR
controller-manager Healthy ok
scheduler Healthy ok
etcd-0 Healthy {"health": "true"}
pasapicella@pas-macbook:~/pivotal/GCP/install/21/PKS$ kubectl get pods
No resources found.
pasapicella@pas-macbook:~/pivotal/GCP/install/21/PKS$ kubectl get deployments
No resources found.
9. Finally lets start the Kubernetes UI to monitor this cluster. We do that as easily as this.
pasapicella@pas-macbook:~/pivotal/GCP/install/21/PKS$ kubectl proxy
Starting to serve on 127.0.0.1:8001
The UI URL requires you to append /ui to the url above
Eg: http://127.0.0.1:8001/ui
Note: It will prompt you for the kubectl config file which would be in the $HOME/.kube/config file. Failure to present this means the UI won't show you much and give lost of warnings
More Info
https://docs.pivotal.io/runtimes/pks/1-0/index.html


No comments:
Post a Comment